身為一個maker當然什麼都要學一點拉 XDD ~~
這次想研究的是Google Maps Android API v2 如何順利work!!!
現在學程式幾乎都在網路上找的到資源或者需要看哪本書???
立馬就去找google大神來學習一下 (省錢)
https://developers.google.com/maps/documentation/android/
假如打開連結看到中文的人,請別依賴看這種大綱式的中文譯文 [有看跟沒看一樣]
在此教你們一招,將網頁拉至左下角把語言換至English (相當重要)

按下F5後會多出許多資訊,講解變的完整且詳細瞜!!!
開始學習 get started !!! 首先先看看Introduction吧!!!
https://developers.google.com/maps/documentation/android/intro
其中Attribution Requirements提到記得要在你的app中加入Legal Notices(法律聲明)!!!
1. 安裝 the Android SDK. [下載連結]
2. 安裝並配置 Google Play services SDK.
The Google Maps Android API v2是Google Play services SDK的一部分. 可以透過Eclipse> Window> Android SDK manager 來下載, 安裝勾選 Extra> Google Play services 與 Android Support Library.
複製the library project到你的工作環境裡頭
2-I. 選擇 File> Import > Android > Existing Android Code Into Workspace, 並點擊 Next.
2-II. 瀏覽Browse, 選擇 <android-sdk-folder>/extras/google/google_play_services/libproject/google-play-services_lib, 並點擊 Open.
2-III. 勾選 Copy projects into workspace, 並點擊 Finish.
2-IV. 使Google Play services作為一個library: 右鍵點選google-play-services_lib project, 選擇Properties > Android, 勾選 Is Library選項. [原文連結]

2-V. 於app's project參照Google Play services.[按右鍵properties> Android 參照成功為綠色打勾]

2-VI. 編輯專案中的AndroidManifest.xml, 於<application> element下,增加以下宣告[declaration]:
<meta-data android:name="com.google.android.gms.version" android:value="@integer/google_play_services_version" />3-I. Eclipse> Window> Preferences> Android> Build 取得SHA1的key, 複製起來.

3-II. 進入申請API key連結. (首先你要申請一個google帳號),按下Create project建立專案並點選左邊Services, 找到Google Map Android API v2 項目, 點擊開關為ON.

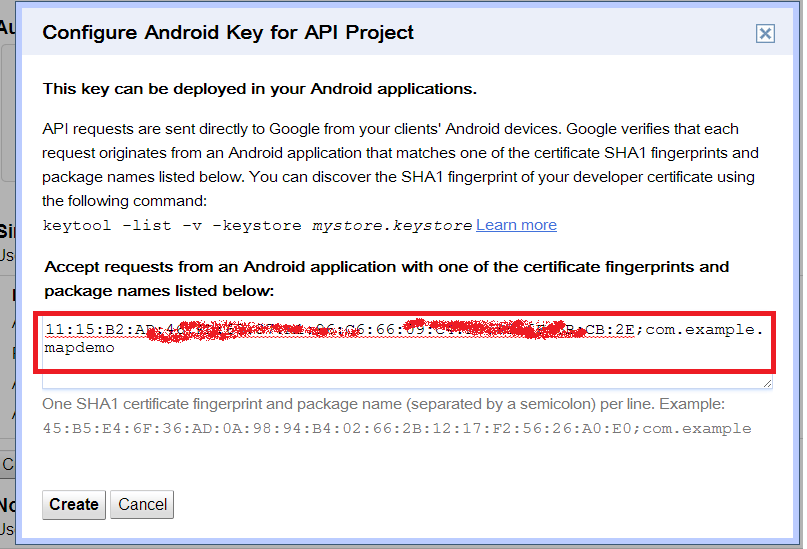
3-III. 點選Google Apis Console網頁左邊API Aceess, 選擇Create New Android key.

3-IV. 將SHA1的key貼上,後頭加上分號(;)與package name,按下Create取得API key.
3-V. 取得API key後,放置於你的App之中
編輯專案中的AndroidManifest.xml, 於<application> element下,插入於Closing tag </application>之前:
<meta-data
    android:name="com.google.android.maps.v2.API_KEY"
android:value="API_KEY"/>4. 在application manifest中,具體指名 app 設定.
指名權限 [Specify permissions],藉由增加<uses-permission> elements 當作 <manifest> element的children屬性:
<uses-permission android:name="permission_name"/><uses-permission android:name="android.permission.INTERNET"/><uses-permission android:name="android.permission.INTERNET"/>
<uses-permission android:name="android.permission.ACCESS_NETWORK_STATE"/>
<uses-permission android:name="android.permission.WRITE_EXTERNAL_STORAGE"/>
<!-- The following two permissions are not required to use
Google Maps Android API v2, but are recommended. -->
<uses-permission android:name="android.permission.ACCESS_COARSE_LOCATION"/>
<uses-permission android:name="android.permission.ACCESS_FINE_LOCATION"/>android.permission.INTERNET=被API使用,從Google Maps servers下載地圖圖資。android.permission.ACCESS_NETWORK_STATE=允許API去check連線狀態,為了確認是否圖資可以被下載。android.permission.WRITE_EXTERNAL_STORAGE=允許API緩存地圖圖資在裝置的外在儲存空間。
android.permission.ACCESS_COARSE_LOCATION=允許API使用WiFi或行動網路數據來決定裝置的位置。android.permission.ACCESS_FINE_LOCATION=允許API使用Global Positioning System(GPS)來決定裝置的位置縮至非常小的區域裡頭。
編輯專案中的AndroidManifest.xml, 於<manifest> element下,建議添加下列<uses-feature> element:
<uses-feature
        android:glEsVersion="0x00020000"
        android:required="true"/>
5. 新增一個地圖 [使用的範例設定如下]
Application Name=ExMap;
Package Name=com.fatigue.exmap;
Activity Name=ExMapActivity;
Layout Name=ex_map;
在此專案中,除了上述所有設定外,將必須改變以下兩個檔案:
a. 定義app layout的XML檔案; b. 主要的activity Java檔案.
5-I. 增加下面片段在app layout XML檔案裡,內容全部取代 [eg. res/layout/ex_map.xml]:
6. 請開啟你的Android裝置的開發者模式,並接上電腦.
選擇此專案, 並點擊Run> Run來執行此ExMap app.
應該會看到一個地圖!!! ~~ (success!!!)
 必須使用實機來執行[據說AVD虛擬裝置無法執行?!?]
Application Name=ExMap;
Package Name=com.fatigue.exmap;
Activity Name=ExMapActivity;
Layout Name=ex_map;
在此專案中,除了上述所有設定外,將必須改變以下兩個檔案:
a. 定義app layout的XML檔案; b. 主要的activity Java檔案.
5-I. 增加下面片段在app layout XML檔案裡,內容全部取代 [eg. res/layout/ex_map.xml]:
<?xml version="1.0" encoding="utf-8"?>
<fragment xmlns:android="http://schemas.android.com/apk/res/android"
          android:id="@+id/map"
          android:layout_width="match_parent"
          android:layout_height="match_parent"
          android:name="com.google.android.gms.maps.MapFragment"/>
5-II. 增加下列code在主要的activity Java檔案裡,內容全部取代[eg. ExMapActivity.java]:
package com.fatigue.exmap;
import android.app.Activity;
import android.os.Bundle;
public class ExMapActivity extends Activity {

    @Override
    protected void onCreate(Bundle savedInstanceState) {
        super.onCreate(savedInstanceState);
        setContentView(R.layout.ex_map);
    }
}
6. 請開啟你的Android裝置的開發者模式,並接上電腦.
選擇此專案, 並點擊Run> Run來執行此ExMap app.
應該會看到一個地圖!!! ~~ (success!!!)
測試環境為Windows 7 & Nexus 7
感謝大家閱讀 ^__^ ~~